


When used correctly, the Text widget is a powerful widget that easily allows the styling and displaying of text. Here are some questions you are likely to ask yourself when dealing with texts
How do I change the font of my text?

 Fonts are important in determining the feel of your application.
The Text widget has a parameter called style. This takes in a TextStyle widget that allows you to add multiple styles to a widget’s font. As you can see below, it takes in multiple arguments, including **fontSize, fontWeight, fontFamily**and**fontStyle.**
class _MyHomePageState extends State<MyHomePage> {
  String playerName = "Serena";

  @override
  Widget build(BuildContext context) {
    return Scaffold(
      backgroundColor: Colors.black,
      appBar: AppBar(
        title: Text(widget.title),
      ),
      body: Center(
        child: Center(
          child: Text(
            'VOGUE',
            textAlign: TextAlign.center,
            style: TextStyle(
                fontWeight: FontWeight.w100,
                fontSize: 100,
                fontFamily: 'Vogue',
                color: Colors.white),
          ),
        ),
      ),
    );
  }
}
The font size takes in a double value for the size. The font weight takes in a class FontWeight that contains a static fields with various levels of thickness, ranging from FontWeight.*w100 to *FontWeight.*w900— the latter being the thickest. *The font family, as shown on line 15, takes in a string of the name of the font you wish to use.
How do I use custom fonts with the text widget?
To use a custom font, you must first download the font and include the font’s .ttf file in your project. You then make reference to the asset in your pubspec.yaml file.
flutter:
  # To add custom fonts to your application, add a fonts section here,
  # in this "flutter" section. Each entry in this list should have a
  # "family" key with the font family name, and a "fonts" key with a
  # list giving the asset and other descriptors for the font. For
  # example:
  fonts:
    - family: Vogue
      fonts:
        - asset: fonts/Vogue.ttf
In my project, I have created a fonts folder in the project root and placed in a font called Vogue.ttf. The name you give it, as shown in line 8, can be anything. This is what you use pass as a string to your method. So, in this instance, in my Text widget, I would set the fontFamily as ‘Vogue’.
How do I add padding to text?
To add padding to text, you wrap your text widget in a Padding widget. Every padding widget, must give a value to the padding value (as shown in line 6).
class TextPage extends StatelessWidget {
  @override
  Widget build(BuildContext context) {
    return Container(
      child: Padding(
        padding: const EdgeInsets.all(8.0),
        child: Text(
          'Hello',
          style: TextStyle(
              fontWeight: FontWeight.bold,
              fontSize: 40,
              fontFamily: 'Roboto',
              color: Colors.white),
        ),
      ),
    );
  }
}
The value of padding, however, must be of typeEdgeInsetsGeometry . This determines the amount of space by which to create distance around the child widget. EdgeInsets comes with a few options to make life easier.
EdgeInset.all(8)— adds padding to all sides of a widgetEdgeInset.only(left: 8)— adds padding to only one sideEdgeInset.symmetric(vertical: 8, horizontal: 0)— adds same amount of padding to opposite sides.
How do I make text clickable?
On its own, the Text widget does not provide a way to be clickable. However, this can be solved by wrapping it with GestureDetector or InkWell.
class TextPage extends StatelessWidget {
  @override
  Widget build(BuildContext context) {
    return Container(
      child: GestureDetector(
        onTap: () {
          print('tapped');
        },
        child: Text(
          'Hello',
          style: TextStyle(
              fontWeight: FontWeight.bold,
              fontSize: 40,
              fontFamily: 'Roboto',
              color: Colors.white),
        ),
      ),
    );
  }
}
The GestureDetector allows your text to respond to taps along side a multitude of other touches, including onTapUp, onTapCancel, onHorizontalDragDown, onSecondaryLongPressUp and onLongPressStart. As shown on line 6, it takes in a function that allows you to determine what change you wish to occur when your text is clicked.
How do I make my text fit inside a space?
This is super simple. To make sure, your text does not extend infinitely, we use something that Text widget provides called softWrap. By default, this is set to true in the default DefaultTextStyle.

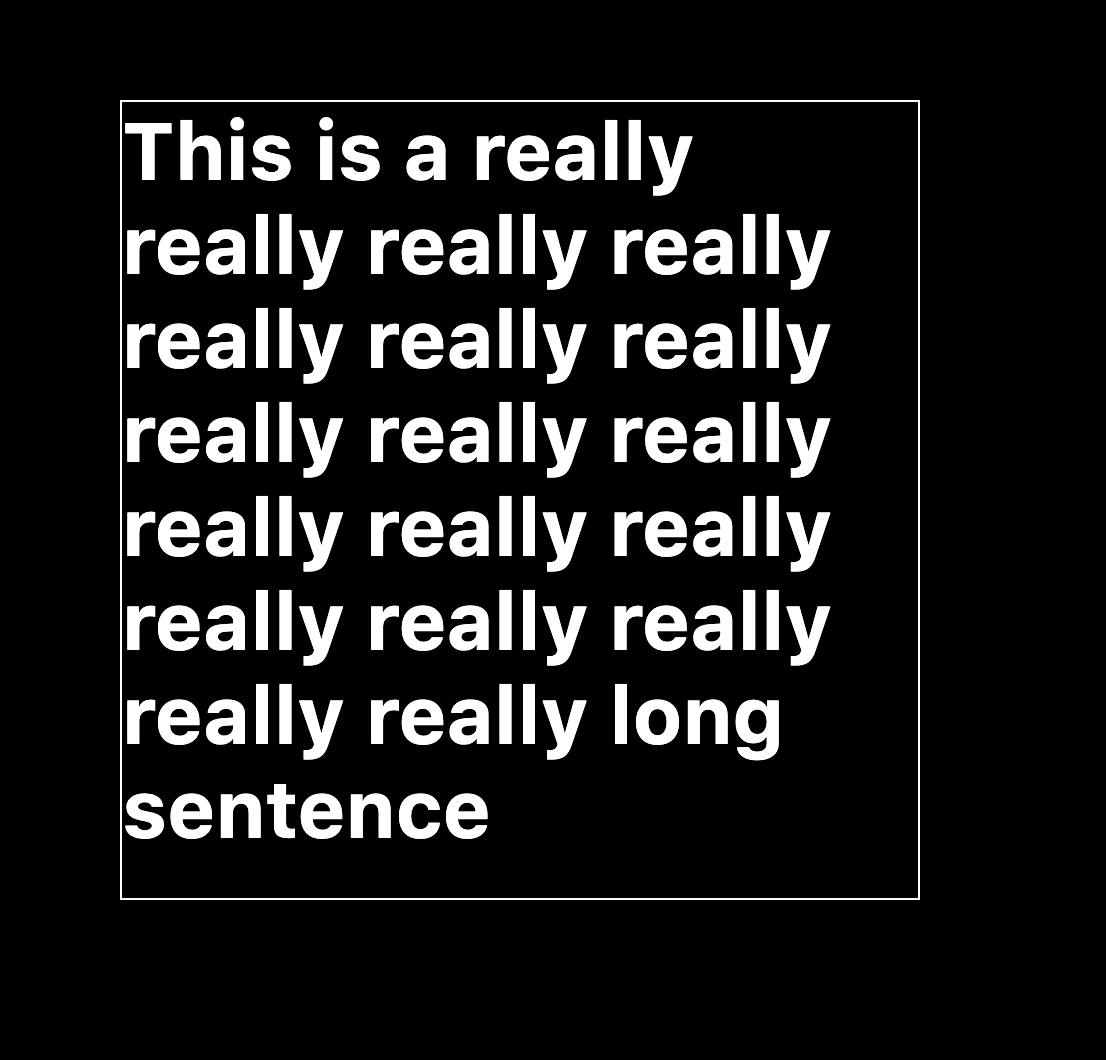 before and after softWrap.
The code below shows how the image above was created.
class _MyHomePageState extends State<MyHomePage> {
  @override
  Widget build(BuildContext context) {
    return Scaffold(
      backgroundColor: Colors.black,
      appBar: AppBar(
        title: Text(widget.title),
      ),
      body: Center(
        child: Container(
          width: 400,
          height: 400,
          decoration: BoxDecoration(
              border: Border.all(color: Colors.white)
          ),
          child: Text(
            'This is a really really really really really really really really really really really really really really really really really really long sentence ',
            style: TextStyle(
                fontWeight: FontWeight.bold,
                fontSize: 40,
                fontFamily: 'Roboto',
                color: Colors.white),
            softWrap: true,  // <- where the magic happens. Set this to true
          ),
        ),
      ),
    );
  }
}
How do I make a text a link?
At the moment, the easiest way to do so is by using a plugin. I recommend url_launcher. Like before, we use the gesture detector to allow us to assert a response to a touch behaviour. So, onTap we call the _launchURL() that allows us to launch the url from a compatible browser on our device. However, if you do set forceWebView: trueon an android device, it opens a web view inside the app.
class _MyHomePageState extends State<MyHomePage> {
  @override
  Widget build(BuildContext context) {
    return Scaffold(
      backgroundColor: Colors.black,
      appBar: AppBar(
        title: Text(widget.title),
      ),
      body: Center(
        child: GestureDetector(
          onTap: _launchURL,  //opens the link in the browser on tap
          child: Text(
            'This is a link',
            style: TextStyle(
                fontWeight: FontWeight.bold,
                fontSize: 40,
                fontFamily: 'Roboto',
                color: Colors.white),
          ),
        ),
      ),
    );
  }

  _launchURL() async {
    const url = 'https://www.google.com';  //change the url here
    if (await canLaunch(url)) {  //checks if there is an app on your phone that can open the browser
      await launch(url, forceWebView: true);   //forceWebView forces it to open a web view inside the app, rather than an external browser
    } else {
      throw 'Could not launch $url';
    }
  }
}
How can I allow users to select and copy text?
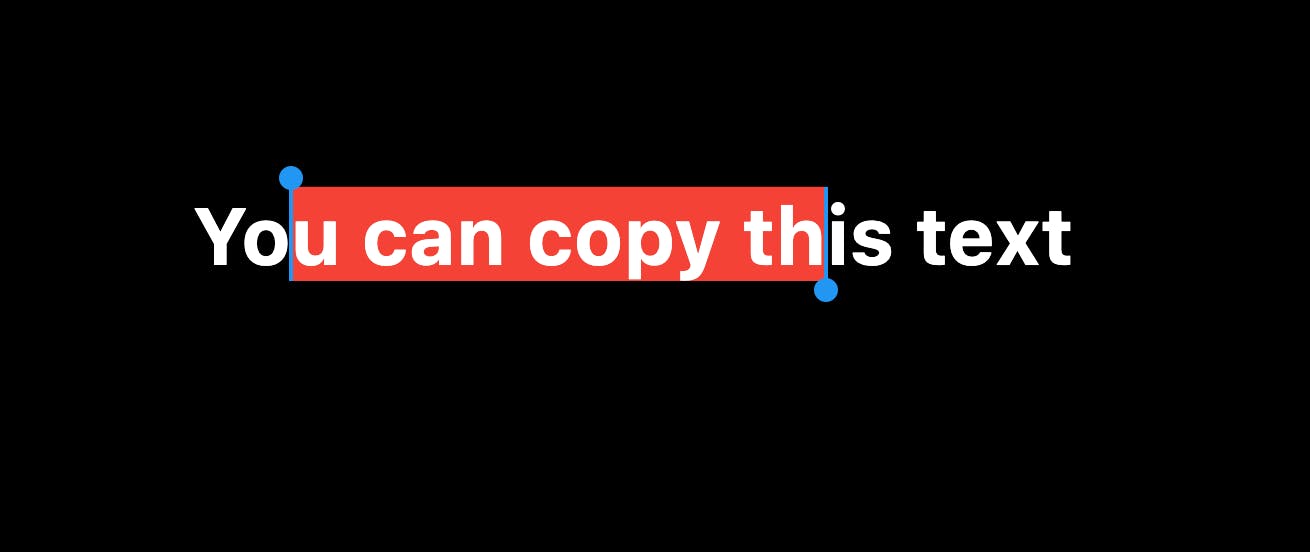 SelectableText widget allows you to highlight and copy text
By default, you cannot select and copy text with the Text widget. Luckily, Flutter has the SelectableText widget, which allows you to grab and copy text. It’s similar to the Text widget, but allows more interactive behaviour. For example, you can set the cursorWidth, cursorHeight, cursorColor and dragStartBehavior.
How do I add variables in my text?
String concatenation is rather straight forward in Dart. All you need to do, as shown in line 14, is to add a $ before adding the variable in curly braces.
class _MyHomePageState extends State<MyHomePage> {
  String playerName = "Serena"; // <- defined variable

  @override
  Widget build(BuildContext context) {
    return Scaffold(
      backgroundColor: Colors.black,
      appBar: AppBar(
        title: Text(widget.title),
      ),
      body: Center(
        child: SelectableText(
          "It is ${playerName}'s turn to serve.", // <- variable wrapped in dollar sign and curly braces
          style: TextStyle(
              fontWeight: FontWeight.bold,
              fontSize: 40,
              fontFamily: 'Roboto',
              color: Colors.white),
        ),
      ),
    );
  }
}
How do I style different parts of my Text?
 Text.rich makes it possible.
From the image above, we have defined a new style specifically for the player’s name. As shown in the snippet below, Text.rich allows you to break your inline text into singular components that you can then work on individually. The style in line 23, defines the base text style. However, we override this for the player’s name.
class _MyHomePageState extends State<MyHomePage> {
  String playerName = "Serena";

  @override
  Widget build(BuildContext context) {
    return Scaffold(
      backgroundColor: Colors.black,
      appBar: AppBar(
        title: Text(widget.title),
      ),
      body: Center(
        child: Text.rich(
          TextSpan(text: "It is ", children: <TextSpan>[
            TextSpan(
                text: "$playerName's ",
                style: TextStyle(
                  color: Colors.redAccent, // <- override the color
                  fontSize: 100, // <- override the font size
                  fontWeight: FontWeight.bold,  // <- override the font weight
                )),
            TextSpan(text: "turn to serve.")
          ]),
          style: TextStyle(
              fontWeight: FontWeight.w100,
              fontSize: 30,
              fontFamily: 'Roboto',
              color: Colors.white),
        ),
      ),
    );
  }
}
How do I make my text vertical?

To achieve the above, we first break down our string into an array of strings and create a text widget for each one. We then stack them on top of each other, like Lego blocks using Wrap. The critical point in this is line 14, where we set the direction of our our widget — this is vertical in our case.
class _MyHomePageState extends State<MyHomePage> {
  String myText = "0123456789";

  @override
  Widget build(BuildContext context) {
    return Scaffold(
      backgroundColor: Colors.black,
      appBar: AppBar(
        title: Text(widget.title),
      ),
      body: Center(
        child: Wrap(
          alignment: WrapAlignment.center,
          direction: Axis.vertical,  //stack individual text widgets on top of each other
          children: _arrayOfText(),
        ),
      ),
    );
  }

  List<Text> _arrayOfText() { // split our text into individual text widgets
    return myText
        .split("")
        .map((letter) => Text(
              letter,
              textAlign: TextAlign.center,
              style: TextStyle(
                  fontWeight: FontWeight.w100,
                  fontSize: 40,
                  color: Colors.white),
            ))
        .toList();
  }
}
The end.
I hope this has been somewhat helpful!